Safety in Flames: 4 Campfire Building Techniques for Every Outdoor Adventure
Updated: 23 Jan 2024
248
Whether you’re a seasoned outdoor camper, a camping novice, or a survivalist, mastering the art of building an effective campfire is a fundamental skill that can enhance your outdoor experience and even save your life in emergencies. Building a campfire is like creating a thrilling friend in the outdoors. To start, gather small sticks, dry leaves, and twigs. So, you must have to follow the Campfire Building Techniques.
These are your fire’s tiny helpers. Make a small teepee with them. Once they catch a little spark, add larger sticks, stacking them like a pyramid. Now, it’s time for the big logs—they’re like the pillars of your fire castle. To help you light up the night and cook up a feast, here are some essential campfire-building techniques tailored for different scenarios and comfort levels.
The Basics: Preparing Your Campfire Site
Before you strike a match, ensure that you’re building your fire safely and responsibly and keep considering campfire safety.
- Choose a Spot: Select a site away from trees, bushes, and other flammable materials. Look for existing fire rings or use a barren spot of dirt.
- Clear the Space: Remove any leaves, twigs, or debris within a 10-foot diameter of your site to prevent accidental fire spread.
- Dig a Pit: For better control, dig a small pit about a foot deep to contain the fire.
- Create a Ring: Surround your pit with a circle of rocks to further contain the fire and reflect heat.
Different Techniques for Building a Successful Campfire:
In this section, we will jump into different campfire Building Techniques.

Technique 1: The Teepee Method
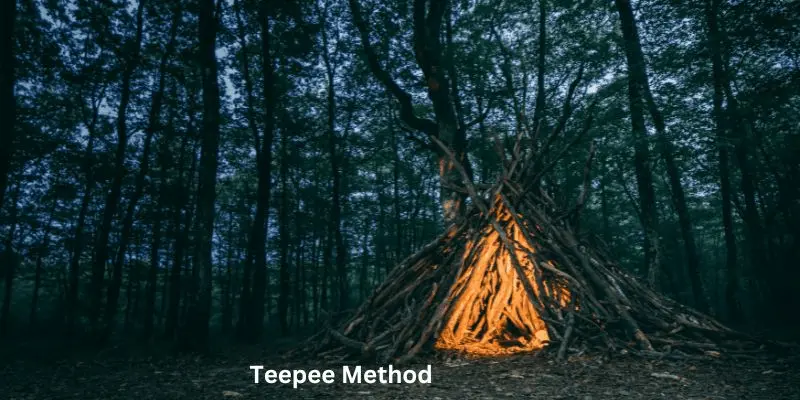
The teepee method is one of the most common and efficient ways to build a fire. To start, gather dry and medium-sized sticks and arrange them in a cone shape, leaving an opening on one side for airflow. Place fire starters or tinder (dry leaves, grass, or paper) in the center of the teepee structure and light it with matches or a lighter. As the flames grow, gradually add larger sticks to build up the fire.
Steps to build up the Teepee Method
To set up the Teepee Method the following steps are performed.
- Start with Tinder: Place a loose bundle of tinder (dry leaves, grass, or fine wood shavings) in the center of your cleared area.
- Construct the Teepee: Arrange kindling (small sticks) around the tinder in the shape of a cone, resembling a teepee.
- Light It Up: Ignite the tinder from as many sides as you can. As the kindling catches fire, the teepee shape will help the flames rise.
- Add Fuel: Gradually add larger sticks and logs to the fire, always maintaining the teepee shape for continuous airflow.
Features of the Teepee Method
- Easy to build
- Creates a strong, high flame ideal for cooking and providing warmth
- Allows for good airflow, promoting efficient burning of the fuel
- Can be easily adjusted by adding or removing sticks to control the size and intensity of the fire
- Takes advantage of the natural structure of sticks, making it a resourceful and eco-friendly option
Technique 2: The Log Cabin Method
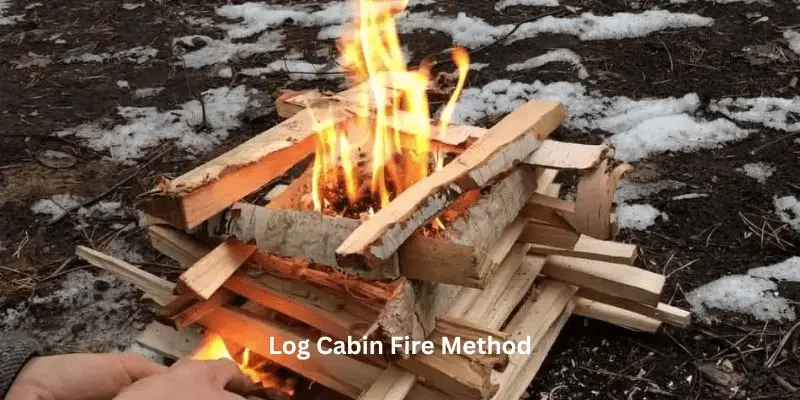
The log cabin method is another popular technique for building a campfire. This method involves placing two larger pieces of wood parallel to each other with a gap between them, then adding two more pieces perpendicular to the first two, creating a square or rectangle shape.
Continue layering smaller sticks and kindling in this manner, leaving enough space for airflow. The log cabin technique is excellent for a more sustained campfire, perfect for cooking and providing lasting heat. Once your structure is built, place your fire starter or tinder in the center and light it.
Steps to build up the Log Cabin Method
To set up the Log Cabin Method the following steps are performed.
- Lay the Foundation: Start with two larger logs parallel to each other, with a space in the middle for tinder.
- Create the Cabin: Cross-stack smaller logs over the base logs to form a cabin. Fill the center with a good amount of fuel.
- Lighting the Tinder: Ignite the Tinder in the center. The structure allows for good ventilation and will catch the logs on fire.
- Maintaining the Fire: Keep adding logs in the log cabin formation as needed to maintain the structure and the fire.
Features of the Log Cabin Method
- Provides a stable base for the fire to sit on, reducing the risk of it collapsing
- Allows for good airflow and efficient burning
- Can be easily adjusted by adding or removing sticks to control the size and intensity of the fire
- Can be used for cooking as well, with the option to place a grill over the top of the structure
Technique 3: The Star Method
The star method involves arranging larger sticks in a star-shaped pattern, with a small gap in the center for lighting. Place fire starters or tinder in the middle of the star and light it. As the fire grows, add smaller sticks and kindling on top of the larger ones.
For a quick and easy campfire that requires minimal effort, the star method is an excellent option.
Steps to build up the Star Method
To set up the Star Method the following steps are performed.
- Create a Star Shape: Arrange five or six logs in a star shape with their ends touching at the center point.
- Place Kindling: Fill the gaps between the logs with kindling such as twigs, dry leaves, and paper.
- Ignite: Light the kindling from multiple points to ensure an even burn.
- Add Fuel: Once the fire is established, add larger logs on top of the star structure for a sustained flame.

Features of the Star Method
- Creates a visually appealing campfire
- Provides good airflow for efficient burning
- Allows for easy adjustment of the fire’s size and intensity by adding or removing sticks
- Can be used for cooking, with the option to place a pot or pan on top of the star structure
Technique 4: The Lean-To Method
The lean-to method is best used when you have limited resources and need to quickly start a fire. Find a sturdy stick and place it securely into the ground at an angle. Place smaller sticks and kindling against the leaning stick, leaving enough room for air to flow through. Finally, place your fire starter or tinder at the base of the lean-to structure and light it.
Steps to build up the Lean-To Method
To set up the Lean-to Method the following steps are performed.
- Create a Windbreak: Start with a large log acting as a windbreak. Place it lengthwise against the wind.
- Tinder and Kindling: Put your tinder bundle leeward of the log, and prop kindling against it on the opposite side from the wind, creating a leaning wall.
- Ignition: Light the tinder so the wind draws the flame into the kindling.
- Add Fuel: Carefully place larger wood against the lean-to structure without collapsing it.
Features of the Lean-To Method
- Provides good protection from wind and rain.
- Requires less fuel and maintenance compared to the teepee method.
- The lean-to structure can also be used to cook food or heat water by suspending a pot or pan over it.
Other Tips for Building a Campfire
- Always use dry wood and kindling to ensure a successful fire.
- Ensure plenty of ventilation in your fire structure to prevent smothering the flames.
- Do not build your campfire near low-hanging branches, overhanging rocks, or other flammable materials.
- Keep a bucket of water or sand nearby in case of emergencies.
- Never leave your campfire unattended and always fully extinguish it before leaving the site.
With these techniques and tips in mind, you can confidently build a safe and successful campfire during your next outdoor adventure. Just remember always to follow fire safety guidelines and use your best judgment when selecting a campfire site.
Fire Safety and Maintenance
- Never Leave It Unattended: A campfire should always be monitored. An unattended fire can quickly become a wildfire.
- Keep Water Handy: Always keep a bucket of water or sand nearby to extinguish the fire.
- Putting Out the Fire: Douse the fire thoroughly with water, stir the ashes, and apply more water. Repeat until it’s cool to the touch.
Remember, fire safety is of the utmost importance when out in nature. Always follow local regulations and only build fires in designated areas to prevent potentially dangerous wildfires. Additionally, be mindful of the environment and leave no trace behind by properly extinguishing your campfire and cleaning up any remaining debris. By practicing responsible campfire-building techniques, we can ensure the safety of ourselves and the outdoors for future generations to enjoy.
FAQs
Can I use any type of wood for building a campfire?
No, it’s essential to check local regulations and use only designated firewood or deadfall. Avoid using live trees or branches as they can harm the environment.
How do I put out a campfire properly?
Douse the fire thoroughly with water, stir the ashes, and apply more water. Repeat until it’s cool to the touch. Make sure you have a bucket of water or sand nearby for emergencies.
Can I use the same campfire technique for cooking?
Yes, all three techniques can be used for cooking food by suspending a pot or pan over the fire. Just make sure to adjust the size and intensity of the fire accordingly.
What is the best technique to use for a windy campsite?
The lean-to method provides a good balance of protection and ventilation, making it ideal for windy conditions.
Conclusion
Building a campfire is a vital skill for any outdoor adventure, but it’s also essential to do so responsibly and with care for the environment. By following the basic principles and techniques outlined in this guide, you can build a safe, efficient, and enjoyable fire every time. Remember to always follow local regulations and Leave No Trace principles when building a campfire to ensure that nature remains unharmed for future generations to enjoy. Regardless of which method you choose for campfire Building Techniques, always keep a watchful eye on your fire and never leave it unattended.
Please Write Your Comments